Wednesday, 25 April 2007

Transparent textures with MDX

This is just a quick, late night writeup on how to draw transparent textures onto the screen using Managed DirectX.

Firstly, we load the texture in an initilisation routine:

public void Initialize()
{
tex = TextureLoader.FromFile(Form1.Device, ".\\test.png");
rect = new Rectangle(50, 50, 40, 40); // assuming our png is 40x40
}

Then we render the texture onto a 2-triangle trianglefan:

public void Render()
{
// device has been cleared and beginscene has been called

CustomVertex.TransformedTextured[] screenVertices =
new CustomVertex.TransformedTextured[4];
screenVertices[0] = new CustomVertex.TransformedTextured(
rect.X, rect.Y, 1.0f, 1.0f, 0.0f, 0.0f);
screenVertices[1] = new CustomVertex.TransformedTextured(
rect.X + rect.Width, rect.Y, 1.0f, 1.0f, 1.0f, 0.0f);
screenVertices[2] = new CustomVertex.TransformedTextured(
rect.X + rect.Width, rect.Y + rect.Height, 1.0f, 1.0f, 1.0f, 1.0f);
screenVertices[3] = new CustomVertex.TransformedTextured(
rect.X, rect.Y + rect.Height, 1.0f, 1.0f, 0.0f, 1.0f);

Form1.Device.RenderState.SourceBlend = Blend.SourceAlpha;
Form1.Device.RenderState.DestinationBlend = Blend.InvSourceAlpha;
Form1.Device.SetRenderState(RenderStates.AlphaBlendEnable, true);
Form1.Device.SetTexture(0, tex);
Form1.Device.VertexFormat = CustomVertex.TransformedTextured.Format;
Form1.Device.DrawUserPrimitives(PrimitiveType.TriangleFan, 2, screenVertices);

// endscene and present will be called by main render loop
}

The important things to notice are:

  1. RenderState.SourceBlend = Blend.SourceAlpha
  2. RenderState.DestinationBlend = Blend.InvSourceAlpha
  3. SetRenderState(RenderStates.AlphaBlendEnable, true)

This is what the final product looks like:

Tuesday, 24 April 2007

MDX-101: A simple window

To get a simple DirectX window running inside a panel on a form using Managed DirectX do the following:

1) Create a new WinForms project
2) On the main form, drop a panel (panel1) onto the form.
3) Change the Main() function in Program.cs to look as follows:

static void Main()
{
using (Form1 frm = new Form1())
{
frm.Show();

while (frm.Created)
{
frm.Render();
Application.DoEvents();
}
}
}

4) Put the following code into Form1.cs:

private Device device;

public Form1()
{
InitializeComponent();

InitDirectX();
}

void InitDirectX()
{
PresentParameters pp = new PresentParameters();
pp.SwapEffect = SwapEffect.Discard;
pp.Windowed = true;

device = new Device(0, DeviceType.Hardware, panel1,
CreateFlags.SoftwareVertexProcessing, pp);
}

internal void Render()
{
device.Clear(ClearFlags.Target, Color.Black, 1.0f, 0);
device.BeginScene();

device.EndScene();
device.Present();
}


Don't forget to reference Microsoft.DirectX.

That's it.

XNA Refresh Available

The Microsoft XNA Game Studio Express 1.0 Refresh is now available.
Note that the update requires:
  1. Microsoft Visual C# 2005 Express Edition SP1
  2. That you run C# 2005 Express Edition at least once prior to installing the XNA Game Studio Express.
  3. That you register C# 2005 Express Edition prior to installing the XNA Game Studio Express.

If you're upgrading from the 1.0 version of XNA Game Studio Express you do not need to uninstall that version first.

You can download the XNA Framework Redistributable here.

Monday, 23 April 2007

Still busy

I'm busy working on structuring my code and looking at existing games to find out what the best approach would be to maitaining game state. I'll post more about it when I have a difinitive answer.

In the meantime, check out the wallpapers at http://www.socksoff.co.uk/walls01.html .

Thursday, 19 April 2007

XNA and Winforms

Winforms and XNA don't always play well together. I've found a way which allows me to have access to game configuration settings from a Windows form while running the XNA window simultaneously. Changes made to the configuration settings automatically apply to the game while it is running.

The basic concept is as follows:
  • Create a class which holds game configuration.
  • Instantiate that class in the main game file.
  • Create a windows form which will display the configuration settings.
  • Pass the instance of the configuration class to the windows form's constructor.
  • Display the configuration form when the game starts.
  • Use values from the settings class when rendering scenes.
The effect can be seen below:
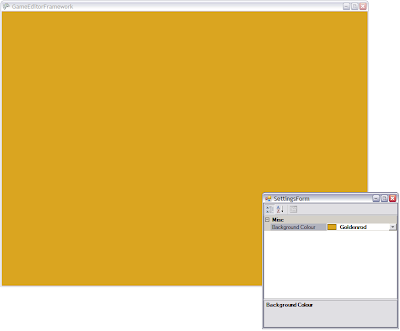

Step by Step instructions:

a) Create a new windows game.

b) Add a public class for storing the game settings. In this case, I only wanted to be able to modify the background colour since I didn't have anything else on the screen. I decided to use the PropertyGrid control since it was easy to use and quick to implement. However, this forced me to use attributed properties in the settings class:
public class GameSettings
{
private System.Drawing.Color m_backGroundColor;
[DisplayName("Background Colour")]
public System.Drawing.Color BackGroundColor
{
get { return m_backGroundColor; }
set { m_backGroundColor = value; }
}
}

One thing to note in the code above is that I used System.Drawing.Color instead of Microsoft.Xna.Framework.Graphics.Color since the PropertyGrid control does not understand the Xna version. I could have spent some time to let the PropertyGrid control work with the Xna Color object but that was out of the scope of what I was trying to achieve. Instead, I simply converted the one color to the other during the rendering phase.

c) Next, we create a new windows form. Mine was called SettingsForm in this case. I dragged a PropertyGrid control from the toolbox onto the new form and ensured that the PropertyGrid was fully docked on the form. I also modified the constructor for the form to accept an instance of the GameSettings class:
public partial class SettingsForm : Form
{
public SettingsForm(GameSettings settings)
{
InitializeComponent();
propertyGrid1.SelectedObject = settings;
}
}

Next, we tell the property grid on our form to use the settings object as the selected object so that the properties within that class can be displayed.

d) Once the form and the settings class have been created, it's time to instantiate them both and relate them to one another. The following is the start of my main game file (game1.cs):
public class Game1 : Microsoft.Xna.Framework.Game
{
GraphicsDeviceManager graphics;
ContentManager content;
GameSettings settings;
SettingsForm settingsForm;

public Game1()
{
graphics = new GraphicsDeviceManager(this);
content = new ContentManager(Services);

settings = new GameSettings();
settingsForm = new SettingsForm(settings);
settingsForm.Show();
}
....
....

We pass the newly created settings object to the constructor of the SettingsForm. This allows the SettingsForm to display the settings we use in our game class. Now all we need to do is use the settings in our render loop:

e) Use the background color setting in our render loop. As discussed earlier, I need to do some conversion between the different Color types:

protected override void Draw(GameTime gameTime)
{
graphics.GraphicsDevice.Clear(new Color(settings.BackGroundColor.R,
settings.BackGroundColor.G, settings.BackGroundColor.B));

base.Draw(gameTime);
}


When the application is run an additional window will open up where changes can be made to settings which will affect how items are rendered.

Wednesday, 18 April 2007

Game Ideas

I've been thinking long and hard about what I would like to learn from this whole exercise. It's not so much that I'm concerned about having a final product but rather that I take the journey to get there. I'm also using this opportunity as an exercise in persistence and tenacity.

So, the following are items I'd like to achieve:
  • A 3D isometric view of a tile-based landscape.
  • A flexible camera with springy effects.
  • Hand-crafted models with animation (not expecting too much here).
  • Some custom shader effects.
  • RTS-style units which can be controlled with the mouse/keyboard.
  • A multiplayer element (not too sure what this would be yet).
  • Particle effects - I think this is how I'll achieve the ultimate: glowy bullets

As far as what the gameplay will be like--I have no idea. It's probably not the right approach but I'm far more interested in figuring out how to do things than coming up with a fun game. I'll guess I'll make it fun as I go along.

Now, I think I should stop posting and start developing. I'm trying to let The Thousander Club motivate me although I think I'll probably try keep to the 100, not the 1000.

Getting started with XNA

I'm sure thousands of XNA bloggers have made blog posts similar to this one but for the sake of being complete I'm going to add it to my blog too.

To get started with XNA development you'll need the following:

1) Windows XP
2) Visual C# Express Edition
3) XNA Game Studio Express
4) Optional but very handy: XBox 360 controller

First things first--install Visual C# Express Edition, and then the XNA Game Studio Express. Once they're both installed run Visual Studio C# Express. Create a new project and choose the Windows Game option from the templates screen.


Select a name for your game and proceed to create the project. Once you've created your project simply hit F5 to compile and run the game. If all went well, you'll be greeted with a wonderful blank window filled with Cornflowerblue (the default XNA blank window colour).


That's it. That's all there is to creating your first XNA game. It doesn't do much right now but it's wonderful to know that it works.

The mini-game competition

So here's how this blog started. David and I are having a friendly competition to see who can make the coolest mini-game. Now, we're swamped with real work so there's absolutely no time to devote to this game (or the required learning to write this game) but it's a great outlet for our frustrations. We're total n00bs when it comes to DirectX and XNA so this is going to be interesting to say the least.

Dave's doing his game in Managed DirectX and I've decided to explore XNA. I'm still not too sure that this is the right decision for me--there are far more code samples out there for MDX. Colin might join us using GL but we're still waiting to see something concrete from him.

As far as game designs go--I keep changing my mind. I need to lock it down soon but I get distracted by all the cool things that you can do with XNA. David has nailed down his spec and seems to be progressing nicely. An important part of his spec was that he wanted "glowy bullets" and "more glowy bullets". I stole that requirement as a name for this blog. I want glowy bullets too damnit! I want to marry glowy bullets and have little glowy bullet babies. So, kudos to David for the cool blog name.

So, where to from here? I guess I'll be posting my progress, my woes, my joys and my frustrations onto this site. I'd like to end up with a blog similar to this one--something that I can look back on and be proud of.

First post and all that junk.

I hate first posts. I'll keep this one short.
Hello.