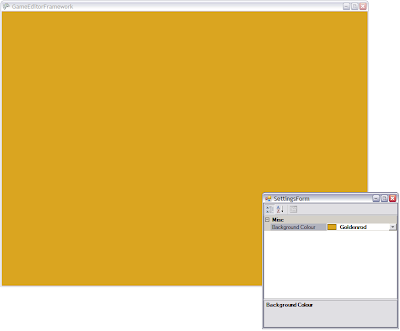
The basic concept is as follows:
- Create a class which holds game configuration.
- Instantiate that class in the main game file.
- Create a windows form which will display the configuration settings.
- Pass the instance of the configuration class to the windows form's constructor.
- Display the configuration form when the game starts.
- Use values from the settings class when rendering scenes.

Step by Step instructions:
a) Create a new windows game.
b) Add a public class for storing the game settings. In this case, I only wanted to be able to modify the background colour since I didn't have anything else on the screen. I decided to use the PropertyGrid control since it was easy to use and quick to implement. However, this forced me to use attributed properties in the settings class:
public class GameSettings
{
   private System.Drawing.Color m_backGroundColor;
   [DisplayName("Background Colour")]
   public System.Drawing.Color BackGroundColor
   {
       get { return m_backGroundColor; }
       set { m_backGroundColor = value; }
   }
}
One thing to note in the code above is that I used System.Drawing.Color instead of Microsoft.Xna.Framework.Graphics.Color since the PropertyGrid control does not understand the Xna version. I could have spent some time to let the PropertyGrid control work with the Xna Color object but that was out of the scope of what I was trying to achieve. Instead, I simply converted the one color to the other during the rendering phase.
c) Next, we create a new windows form. Mine was called SettingsForm in this case. I dragged a PropertyGrid control from the toolbox onto the new form and ensured that the PropertyGrid was fully docked on the form. I also modified the constructor for the form to accept an instance of the GameSettings class:
public partial class SettingsForm : Form
{
   public SettingsForm(GameSettings settings)
   {
       InitializeComponent();
       propertyGrid1.SelectedObject = settings;
   }
}
Next, we tell the property grid on our form to use the settings object as the selected object so that the properties within that class can be displayed.
d) Once the form and the settings class have been created, it's time to instantiate them both and relate them to one another. The following is the start of my main game file (game1.cs):
public class Game1 : Microsoft.Xna.Framework.Game
{
   GraphicsDeviceManager graphics;
   ContentManager content;
   GameSettings settings;
   SettingsForm settingsForm;

   public Game1()
   {
       graphics = new GraphicsDeviceManager(this);
       content = new ContentManager(Services);

       settings = new GameSettings();
       settingsForm = new SettingsForm(settings);
       settingsForm.Show();
   }
   ....
   ....
We pass the newly created settings object to the constructor of the SettingsForm. This allows the SettingsForm to display the settings we use in our game class. Now all we need to do is use the settings in our render loop:
e) Use the background color setting in our render loop. As discussed earlier, I need to do some conversion between the different Color types:
protected override void Draw(GameTime gameTime)
{
   graphics.GraphicsDevice.Clear(new Color(settings.BackGroundColor.R,
       settings.BackGroundColor.G, settings.BackGroundColor.B));

   base.Draw(gameTime);
}
When the application is run an additional window will open up where changes can be made to settings which will affect how items are rendered.
No comments:
Post a Comment